Sassafras Eats

Healthy food, happy life.

Category: Nut Free

Cheesy Vegan Summer Ratatouille

This is my new favorite summer meal. I’ve made it twice in the past 4 days and I have a feeling that it’s going to become a weekly staple.

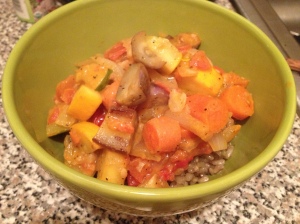
Last Saturday I was hungry, but I didn’t know what I wanted and takeout felt like a cop-out, so I decided to marinate in my own hunger and drink rose until I could figure out what to do. I’ve been wanting to make ratatouille for a while, and had bought eggplant, squash and onions at the market that morning, et voila! Ratatouille it was. Stir-fried, cooked in a homemade tomato sauce and then hit with some nutritional yeast to make it extra cheesy, I devoured this like a crazy woman.

Recipe: Cheesy Vegan Summer Ratatouille

Serves: 2

Prep Time: 10 minutes

Cook Time: 45 minutes if over rice, 25-30 if over pasta

Ingredients:

1 squash, chopped

1 eggplant or 10 baby eggplants, chopped

2 tomatoes, diced

1 white onion, chopped

2 carrots, chopped

5-7 cloves of garlic, diced

2 tablespoons nutritional yeast

salt, pepper and cayenne to taste

2 tsps coconut oil, split

2 servings brown rice or pasta (1/2 cup and 1 cup dry, respectively)

Directions:

If serving your ratatouille over rice, put the rice on first and cook per the package directions. Tonight I cooked mine in some leftover veggie broth I had, which made it extra savory. Over the weekend I made it with quinoa pasta, which was also extremely delicious.

To make the tomato sauce, place the diced garlic and chopped onions in a saucepan with the coconut oil. Saute for 5-7 minutes, or until the onions become transparent. Add the chopped tomatoes, cook for about 5 minutes at a medium temperature, and then turn the heat down and let reduce. Continue adding salt, pepper, cayenne, or whichever spices you prefer, to taste.

IMG_2195

IMG_2196

As the sauce is cooking, place the chopped vegetables in a saute pan with the rest of the coconut oil and begin cooking. You’ll want them to really cook down – the vegetables in a ratatouille should be soft, nearly falling apart (although I prefer mine a few degrees more solid.)

IMG_2198

Once the tomatoes have cooked down into a sauce, add the nutritional yeast and stir it all together. Try not to keep “tasting” the sauce. This is the part of the process where half the food I’m cooking mysteriously disappears.

IMG_2197

Add the cheesy tomato sauce to the vegetables, turn down low and let them simmer and stew. Continue to season as you wish, and let the flavors develop and steep as the rice finishes cooking.

Once the rice is cooked, take it off the heat and let sit for ten minutes (if you have that kind of patience, which I never do. Although it does make the rice fluffier.) If the rice isn’t completely cooked but the liquid is all gone, add a bit more water and continue cooking until it’s nice and fluffy. The ratatouille can continue cooking for a while – like any good stew, this only makes it better, so don’t worry about keeping it going.

Take the rice off the heat, separate into bowls, top with the ratatouille and give praise to the gods of summer vegetables. It doesn’t get better than this.

IMG_2199

Vegan Elote + Baked Sweet Potato

Tonight’s dinner was an exercise in simplicity. An attempt to elevate foods I already had in my in my kitchen with a new mix of spices for something delicious and uncomplicated. I bought a couple ears of corn last week because I am from Iowa and summer just isn’t right without  buttery, salty ears of corn on the cob as often as possible. I decided to roast the corn and evoke flavors of Mexican elote (corn on the cob with spices, crema and cheese) with a bit of vegan flair. Cayenne adds heat. while the nutritional yeast provides a nutty cheesiness.

Recipe: Vegan Elote + Baked Sweet Potato

Prep: 3 minutes

Cook time: 45 minutes

Ingredients:

sweet potato

corn on the cob (I had 2 corns on the cob. You should have as many cobs and potatoes as you’d like.)

Earth Balance

cumin

cayenne

nutritional yeast

paprika

salt

pepper

olive oil

Instructions:

Notice how there are no ingredient amounts? Because this is not a recipe that benefits from that. Load it up with spices and vegan butter however you see fit, and I will guide you along the way.

First, preheat your oven to 450 degrees. Poke 4-6 holes with a fork into your sweet potato and toss it into the oven. I coated mine with olive oil first to crisp up the skin, although this is not necessary. It should cook for 45 minutes, give or take 5 depending on the size of your sweet potato. (Mine was smaller than normal – usually I try to find the King Kamehameha [as my father would say] of potatoes, because my capacity for baked potatoes knows no boundaries.)

Add a teaspoon, minimum, each of cumin, cayenne, nutritional yeast and paprika to a bowl. Season with salt and pepper and mix together until they’re all combined.

Coat your corn with Earth Balance, olive oil, or whatever you choose. Then coat generously with the seasoning mix. Leave a bit leftover, as some will dissipate while roasting and it’s nice to freshen the flavor once it’s cooked.

Put the corn in the oven with the sweet potato after 30 minutes. The corn only needs to cook 15 minutes, so gauge this however works for you.

Take the sweet potato and the corn out of the oven, top with more Earth Balance and seasoning as needed, and enjoy.

Spice mixture.

Spice mixture.

Pre-bake.

Pre-bake.

Post-bake.

Post-bake.

Complete!

Complete!


Pineapple Ginger Stir-fry with Snow Peas, Cabbage and Zucchini

I love ginger. It is one of my favorite healing foods, and between juicing and ginger tea, I get a healthy dose of this spicy root every day. This week hadn’t been a huge cooking week for me – I was headed out of town to Chicago (where I am writing this now) to visit friends and family, so it was more about cleaning up shop and eating things I didn’t want left behind in my fridge.

We got an awesome CSA haul this week (I’m trying to get better about photo-documenting everything, but as you can see from a steady stream of iPhone photos, photography is not my strongest suit. One step at a time, though.) and I was excited to create something inspired by all my new produce: snap peas, zucchini, swiss chard, two huge heads of lettuce, cilantro, strawberries, rhubarb, mixed greens, 1/2 dozen eggs and lavender (which was put in a vase and not in the fridge – another thing I should have photographed.) So I decided to make a stir-fry with a tamari (gluten-free soy sauce) and ginger sauce. The pineapple adds a delicious sweetness to this dish, which cuts wonderfully against the acidity of the tamari and the spiciness of the ginger. Because the vegetables are all quite crunchy, the soft, slightly meaty pineapple provides a nice textural contrast as well. If a dish is too one-sided it throws off the equilibrium, and you may finish something divine only to end up trying to satiate a textural craving in another way (like when I eat a meal that doesn’t have enough crunch, and I wind up craving a handful of chips. How elegant.) I ended up serving mine over quinoa, rather than brown rice, because I wanted the extra nutritional boost. That’s the beauty of a stir-fry though – like chili – it can really be adapted to suit whatever taste you’re in the mood for. This would be delicious over quinoa pasta, farro, spelt, groats, lentils – pick your nutritional poison and go to town.

Recipe: Pineapple Ginger Stir-fry with Snow Peas, Cabbage and Zucchini

Serves: 1-2

Prep time: 15 minutes

Cook time: 15 minutes

Ingredients

3 inch hunk of ginger, peeled and diced (I am a ginger freak though. This is a lot of ginger, feel free to start with 1 or 2 inches and increase to suit your taste.)

3 cloves garlic, diced

1/4 cup tamari

1/4 cup water

1/4 cup vegetable stock (Pacific’s veggie pho soup base would be amazing here – it’s my new favorite veggie stock, although I got really inspired to start making my own after reading this post about freezing all your veggie clippings for to save for stock-making.)

1/2 cup pineapple, cut into 1/2 inch hunks

1 cup snow peas

1 huge hunk of cabbage, loosely chopped

1 zucchini, chopped

1 cup cooked quinoa

For the sauce:

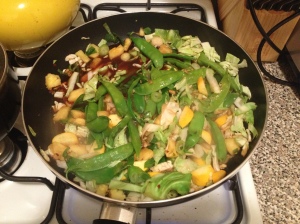
I really want to start making miso-based sauces for Asian-inspired dishes, but here I was aiming to utilize items I already had in my cabinet. This makes quite a bit of sauce, but I put some aside so I can make this again later on in the week. Put the diced ginger and garlic in a bowl with the tamari, water and veggie stock. Mix well. Make the sauce first so the ginger flavor has adequate time to develop.

For the stir-fry:

First, make the quinoa according to the package directions. 2 cups water per 1 cup quinoa, always. This takes about 15-20 minutes depending on how much you’re making. I was waiting for a very handsome delivery man to bring the CSA veggies home, so I made mine about 45 minutes before I started cooking and just kept it on the stove in the pan. The veggies will heat it back up, so don’t worry about trying to keep the quinoa hot. I also used spoonfuls of it to continually test the sauce…you know, just to make sure it was still good.

IMG_1964

I’m trying to find ways to use a little less oil in my cooking, which is why this recipe is oil-free. Put a bit of the sauce in a pan with all the veggies (and pineapple) to start them frying. Spoon out the ginger and garlic that’s sunk to the bottom of the bowl and toss that into the pan so that it gets fried up with the vegetables. I removed about half of the ginger and garlic from the original mixture. After 5 minutes or so, start adding a bit more sauce in to the pan. I like things very saucy, so that there’s extra juice to soak into the grain. Once there is enough sauce in the pan so the vegetables won’t burn, turn the heat down a bit and let them marinate in all the gingery goodness. I prefer my veggies cooked well, but still a bit crispy. Once they’re cooked through, take them off the heat. Put however much quinoa you’d like in a bowl, and layer on the veggies. I topped my bowl off with a bit more sauce for good measure. For an extra boost of ginger, I paired this with a ginger, cabbage, fennel, pineapple juice (in a wine glass, of course). It’s my new favorite cocktail for digestion support. Enjoy!

IMG_1968

Please ignore the heinous flash-attack of this photo. I was starving, and patience was waning.

Vegan Chili, For the Win

Growing up, one of my very favorite meals of my mother’s was her chili. So hearty and rich and perfectly seasoned, I would always have seconds, topped with mountains of saltines (then, a childhood staple.) Over the years I’ve asked her to send me her recipe hundreds of times, until I finally got comfortable enough with my own version to make it as effortlessly as she always has.

Today I had a kind of nagging hunger all day without any sense of what I was actually hungry for. Nothing sounded good, I still could not stomach the idea of anything green after my misadventures with dirt. It’s a gross, rainy day in New York and I really just wanted something warm, comforting and delicious. Also, I’m a big fan of making a large pot of something on Mondays, because I take my lunch to work everyday, so this allows me to always have something on standby for when the week inevitably gets busier than planned.

Chili it was.

The best thing about chili is that you can literally throw anything into it. Any veggie, any bean, any random lentils or legumes you have laying around, they all work beautifully and it’s difficult to disappoint. Tonight, I opted for my typical vegetarian chili standby, filled with lots of comforting and colorful veggies, lots of beans and excess amounts of seasoning (I’ve been known to dump half a bottle of chili powder into one pot.) This is an adapted version of my mother’s, but in our house, no chili is left behind. 

Vegan Chili with Zuccinni, Carrot, Onion, Red Pepper, Black and Kidney Beans

Serves: 6-8

Prep time: 20 minutes

Cook time: 30 minutes – an hour, depending on how patient and/or hungry you are

Ingredients – again, this is based on what I happened to have in my refrigerator. It could literally be adapted with any vegetable you choose.

1 zuccinni, chopped

2 carrots, peeled and chopped

1 red onion, chopped

1 red pepper, chopped

4 cloves garlic, diced

2 cans black beans, rinsed

1 can kidney beans, rinsed

1 28oz can crushed tomatoes (or jarred, if you can find them. Canned tomatoes are actually the most toxic canned foods, because they are the most susceptible to the BPA in the can’s lining. Eden Organics is the only brand that has BPA-free linings, so if you can’t find jarred, which I could not tonight, they are your safest bet. You could also chop up two fresh tomatoes and forego the prepared version entirely.)

3 tablespoons chili powder

1 teaspoon cayenne pepper (or to taste, I like everything spicy)

salt and pepper to taste

1 tablespoon coconut oil

1/4 cup water, to thin it all out

Directions

Once you’ve chopped the onion and garlic, toss it into the pan with the coconut oil and let them cook first on medium-high heat. This is important, because this is how you really get the flavor going. One time I just put everything in together at the same time and couldn’t figure out why it wasn’t as flavorful as it usually is. Upon finding out that I didn’t cook the garlic and onion first, my sister quite literally schooled me (while also saving my chili), and I have never done it since. There is definitely something to letting the flavors build.

Isn't that little tasting spoon the cutest? I usually find a way to taste a lot while I'm cooking.

Isn’t that little tasting spoon the cutest? Also, you are looking at the whole of my kitchen’s counter space.

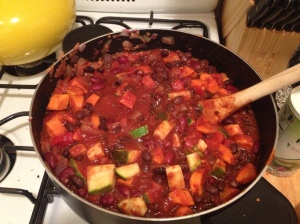
Let those cook while you’re chopping up all the other vegetables. After 5-10 minutes, put the rest of the vegetables in with your tomatoes. Add your rinsed beans, top with all the seasoning and then mix together. When it comes to seasoning chili, I don’t think there’s just one way to go. Like with everything, I continue seasoning the entire time it’s cooking. And enjoy a bit of experimentation! Cumin, paprika, basil, garlic salt, chili garlic powder – the best thing about chili is that it embraces every herb, spice and flavor equally. It’s pretty hard to mess up chili – it’s a very forgiving dish. So go with your instinct and play around.

IMG_1922

After about 15 minutes, turn the heat down to low and set simmer for 30, or until the vegetables are cooked through. I prefer a bit of crispness to my vegetables still, especially as I’ll continue heating it up throughout the week. Chili is one of those foods that is always better the next day.

IMG_1927

Serve alone, or garnish with tofu sour cream, avocado, vegan or organic cheese. Randomly, I was craving it over pasta (that’s never happened to me before?), so I bought some quinoa pasta to toss it over later on in the week. Enjoy, and let me know your favorite chili variations in the comments!